Accounts Receivable Preferences
Here's how to set up (or change) the preferences and defaults related to the various accounts receivable functions in the system.
1. Left-click on Company and a drop-down menu will appear.
2. Left-click on Company Preferences.
3. This will display the Company Preferences window.
4. By default, you should be on the  tab.
tab.
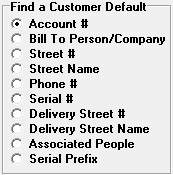
Here you can select the default search method Lynx will use when Finding a Customer.

If you choose "Yes", new customers will automatically be set to Open Item type accounts. If you choose "No", they will be set to Balance Forward.
Open Item accounts are those where payments are specifically applied to individual invoices. Balance Forward accounts are those where payments are simply applied against the account balance.

This setting can be changed here (or for individual accounts) at any time. However, be careful about doing this as this is an important choice. Take the time to decide if you want to handle payments on an Open Item or Balance Forward basis (or a combination of both). If you decide one way and later change, you could end up with a lot of work to get everything back in sync. For instance, if you start an account out as Balance Forward and then switch to Open Item, all of the payments you have entered will have to be individually applied to the matching invoices.


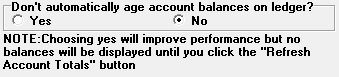
This should always be set to "No". This is a special situation switch that should only be used with help from Columbus Systems.
Note: If you inadvertently set this to "Yes", you will NOT be able to do Period-end Billing because the balances will not be calculated correctly.

Use caution when enabling this feature. Account Balances are not refreshed when the account search form is displayed, and will only be accurate as of the last time aging was done or the account was viewed. Post dated invoices and payments will also be left out of the total.

The date you select will be used as the beginning date for calculating year-to-date totals. These totals show on the bottom left of the Ledger window for each account, like this:

The reason for making this a changeable date is that some companies fiscal year starts on a date other than January first.
Note: This is the ONLY thing that this date is used for. It does not effect anything else.

Here you can select the default terms you would like to use. The terms show up in the top right of printed invoices.

Any number you enter here will be used as the service order number for the next new service order you add to the system. It can be changed anytime.

This is where you will choose the number of the account you use for Cash sales.
For help on on this, see How to Handle Cash Sales.

If you left-click the "Yes" radio button for this option, Lynx will set all user-entered data to be UPPERCASE. This results in a more uniform look. When you apply this preference any data that has already been entered in lowercase will immediately update the next time you edit that information.

This tells the system if you want to allow accounts to be physically deleted from the system or not. If you select "Yes", then accounts can be deleted. However, if you do this, you will not be able to Age Accounts from any date earlier than today since the absence of the deleted accounts will make the aging inaccurate. If you choose "No", then accounts will not be able to be deleted from the system. However, you will be able to age your accounts as of dates earlier than today. By the way, even if you choose to not delete accounts, you can still make them "inactive" when you Set Up Account Preferences.

This will toggle the display of inactive accounts during your Find a Customer searches, if you'd like to see inactive accounts select "No", otherwise, select "Yes". If you're unsure what an inactive account is or how it differs from a deleted acount see The Difference Between Deleted and Inactive Accounts.

This tells the system that you have taxes based on the Point Of Sale location ("POS") of your customers
(as opposed to the location of your plant). If you left-click the "Yes" radio button, the  tab will appear on the account window under the
 .gif) tab. If you choose "No", this tab will not
appear and this function will NOT be available to you.
tab. If you choose "No", this tab will not
appear and this function will NOT be available to you.
For an example of this, left-click here.

This can be a very handy way of eliminating key strokes whenever you are adding or changing an account street address. If you left-click the "Yes" radio button, the next time you want to Add a Customer or Change Customer Information, a drop-down list will appear in the Street Name text box showing all of the street names you have previously used. If one of these names is the same as the one you are entering, all you have to do is left-click on it and that street name as well as the city, state, and zip code will immediately be inserted.
Note: If the street name is NOT in the drop-down list and you left-clicked the "Yes" radio button, key in the street name (as well as the city, state, and zip code). Then, the next time you add or change an address, this information will be available to you from the drop-down list.
Obviously, this feature is most valuable where you have a relatively large number of accounts on a relatively limited number of streets because then you don't have to keep re-keying the same street name over and over. Conversely, if most of your street names are different, this feature will be of less value.
By the way, if you choose "No", this feature will NOT be activated and you will have to key in every street name, city, state, and zip code.

The use of "Tags" gives you a way of classifying your accounts in ways that are specific to you. For instance, you may want to keep track of who you send Christmas calendars to or who your Senior Citizen customers are. For instance:

Tags allow you to do this even though it's not a specific system function per se. You can set them up to mean anything you like. For a complete description of how "Tags" work, see the Set Up Customer Tags procedure.

Any number you enter here will be used as the ACCOUNT NUMBER for the next new account you add to the system. It can be changed anytime and will immediately be used.

Any number you enter here will be used as the VENDOR NUMBER for the next new vendor you add to the system (if you're using Accounts Payable). It can be changed anytime and will immediately be used.