Set Up Customer Tags
The use of "tags" gives you a way of classifying your accounts any way you wish. That is, you can set up different categories that are specific to you (examples might be where you want to keep track of your "Senior Citizen" accounts or accounts that you send Christmas cards to, for instance). These categories can then be printed on customer reports.
This is a three step process:
- You identify your tag(s) on the Company Preferences window.
- You "tag" each account that you want to attach this tag to.
- You print customer reports filtered by this tag(s).
Identify your tags
From the Lynx Main Menu. . .
1. Left-click on Company and a drop-down menu will appear.
2. Left-click on Company Preferences.
3. This will display the Company Preferences Window.
4. Key in the name of the tag(s) in the first available text box(es), like so:
5. When you're done entering your tag names, left-click the 
6. Left-click the close button  to
return to the Lynx Main
Menu.
to
return to the Lynx Main
Menu.
Tag each account (as appropriate)
Find the account you want to add a tag to by using one of the following: Methods of Finding a Customer
1. Regardless of how you get to the account, the account screen for that customer will be displayed.
2. Left-click on the  tab.
tab.
3. This will display the Miscellaneous Information window.
4. You'll notice that each of the tag names you set up in Company preferences now appears as the tag name:
5. Next, enter some code (like "Y" for yes, for instance) to designate the accounts that this tag applies to. In this example, this particular customer would be a "Senior Citizen" account but not an account that you send Christmas Calendars to.

You can have multiple codes per tag type if you like. However, make sure that whatever code(s) you use to designate these tagged accounts is consistent throughout the system. That is, if you choose to use "Y" to designate that a particular tag applies, then ALWAYS use "Y" and not any other code. If you're not consistent, you won't be able to select them correctly when you print a "tagged" list.

6. When you're done with this account, return to step 1 above or left-click
the to return to the Lynx
Main Menu.
Print the tagged accounts
From the Lynx Main Menu. . .
1. Left-click on Reports or left-click
the  button.
2. In either case, a drop-down menu will appear.
3. Left-click on Customer Reports.
There's also a third way to pring customer reports. From the main menu, left-click on Customers and then left-click on Customer Reports.
4. The Choose a Customer Report window will now be displayed. Double-left-click report CR06
"Customer List" (or left-click the report and then left-click the  button).
5. This will display the Format a Customer Report window.
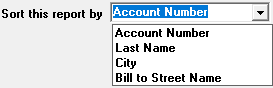
6. If appropriate, select how you want your report sorted by left-clicking
the down arrow  and then left-clicking your
selection from the drop-down list. For example:
and then left-clicking your
selection from the drop-down list. For example:
7. If you want the report to include a selected range of a particular type
of data, left-click the appropriate check box  next to the data type name. Then key in the range of data to
 and
and  . This is called "filtering" the data. If you don't filter the data,
ALL of that data type will print.
. This is called "filtering" the data. If you don't filter the data,
ALL of that data type will print.
Here's an example: If you want your report to include ONLY your customers between account number 1000 and 2000, you would check (by double-left-clicking if it's not already checked) the check box next to Account Number and then keying in the range of account numbers you want included (that is, FROM 1000 THRU 2000). It would look like this:

8. Double-left-click the appropriate check box next to the Tag you want to filter by and then key in the tag
(or range of tags) you want to have included on the report in the and
columns. Such as:

This would format the report to show all accounts that are Y (Yes) for "Senior Citizen".
9. Once you've made your selections, left-click the  button to preview the report on your screen.
10. After your report has appeared on the Print Preview window, you can
left-click the print button  to print the report or
left-click the
to print the report or
left-click the  button to exit.